Stillpoints Aperture II Acoustic Panels
small frames prove extremely useful in near field application
The Stillpoints Aperture Acoustic Panels, available for quite some time now in their original or Series II form, have been reviewed numerous times including by our own Michael Fremer. These reviews have consistently praised the panels' positive impact when placed at the first point of reflection, between or behind the speakers.
Over the years, I have utilized them in my listening room in all these positions. However, during AXPONA 2022, when I entered the Stillpoints room, I was intrigued to find them positioned not on a side wall or between the speakers but rather about two feet from each speaker, at a 45-degree angle from the front outside corners and facing back towards the speaker.
At AXPONA 2023, this year's room had a slightly different layout, with the right panel facing back at the speaker and the left one parallel to the wall.
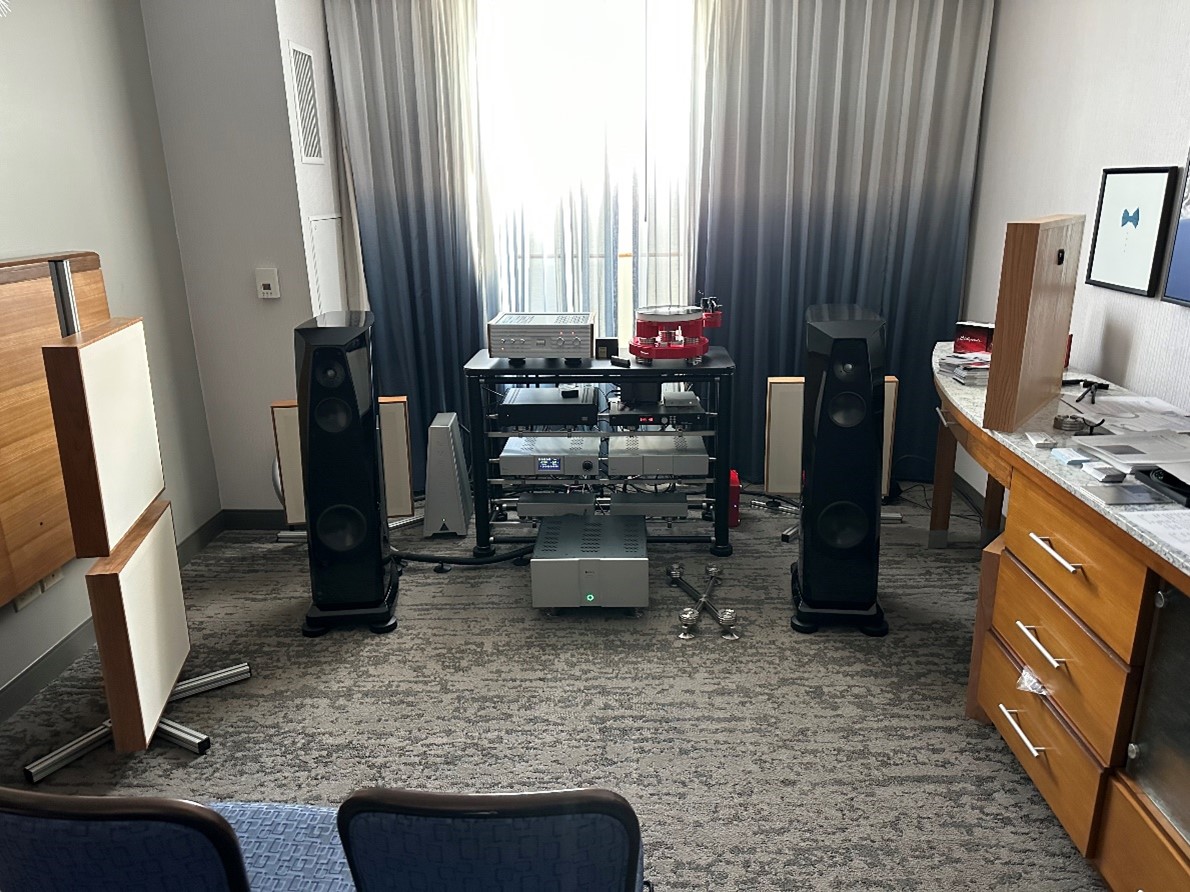
At AXPONA 2022, I asked Paul Wakeen, the owner and designer of Stillpoints, about this setup that had caught my attention. Paul explained that while the Aperture panels are effective when placed on side walls at the first reflection point, a "near field" application could have an even more positive effect. I was intrigued, especially after hearing the outstanding depth of sound produced in a tiny hotel room. The sound field created by the panels went beyond the room's physical boundaries, and compared to other rooms at the show, here there was less "loading up" of the space during complex music or loud peaks. I requested that Paul send me some of the newer Aperture II panels so I could report on their effectiveness in this more recent near-field application.
That was June 2022. Suffice it to say that the Summer and Winter of 2022 will not go down as my healthiest, and the Stillpoints Aperture "near field" experiment got postponed.
Happy to report 2023 has offered much better health, and after graduating from five months of physical therapy, I have finally been able to perform the planned Aperture experiments.
Stillpoints Aperture II Panels
The Aperture II panels are 22" x 22" x 3" and weigh seventeen pounds. They come in three different wood frame finishes - Oak, Cherry, and Walnut - and two screen fabric options, Black or Cream, to blend seamlessly with your room decor. I noticed on the company website that Stillpoints also offers a painted black frame version with black fabric, which I saw in an AXPONA 2023 room and liked. A mounting bracket on the rear, allows for easy wall hanging or attachment to the available Stillpoints stands that can support up to three panels.
When I asked Stillpoints' Bruce Jacobs to explain the Aperture panel's function, he told me that it performs four: It is a resonator, an absorber, a diffusor, and a velocity trap - all in one unit. Admittedly, the first time I heard this description, I was reminded of the old Thermos bottle joke about keeping hot liquids hot in winter and cold liquids cold in summer. That's one smart bottle! How does it know?
From the Stillpoints website:
"The Aperture's unique trapping system captures an area of waveform much broader than its small surface area would suggest.
The Aperture can be used to trap waveforms either facing the wall or, facing away from the wall.
The Aperture effectively increases soundstage width and depth. This is especially true for smaller rooms.
The Aperture will increase the dimensional perspective of the image structure.
The Aperture focuses music and voice without room boundary."
Bold claims indeed ….. Let's investigate.
Aperture II in my Room
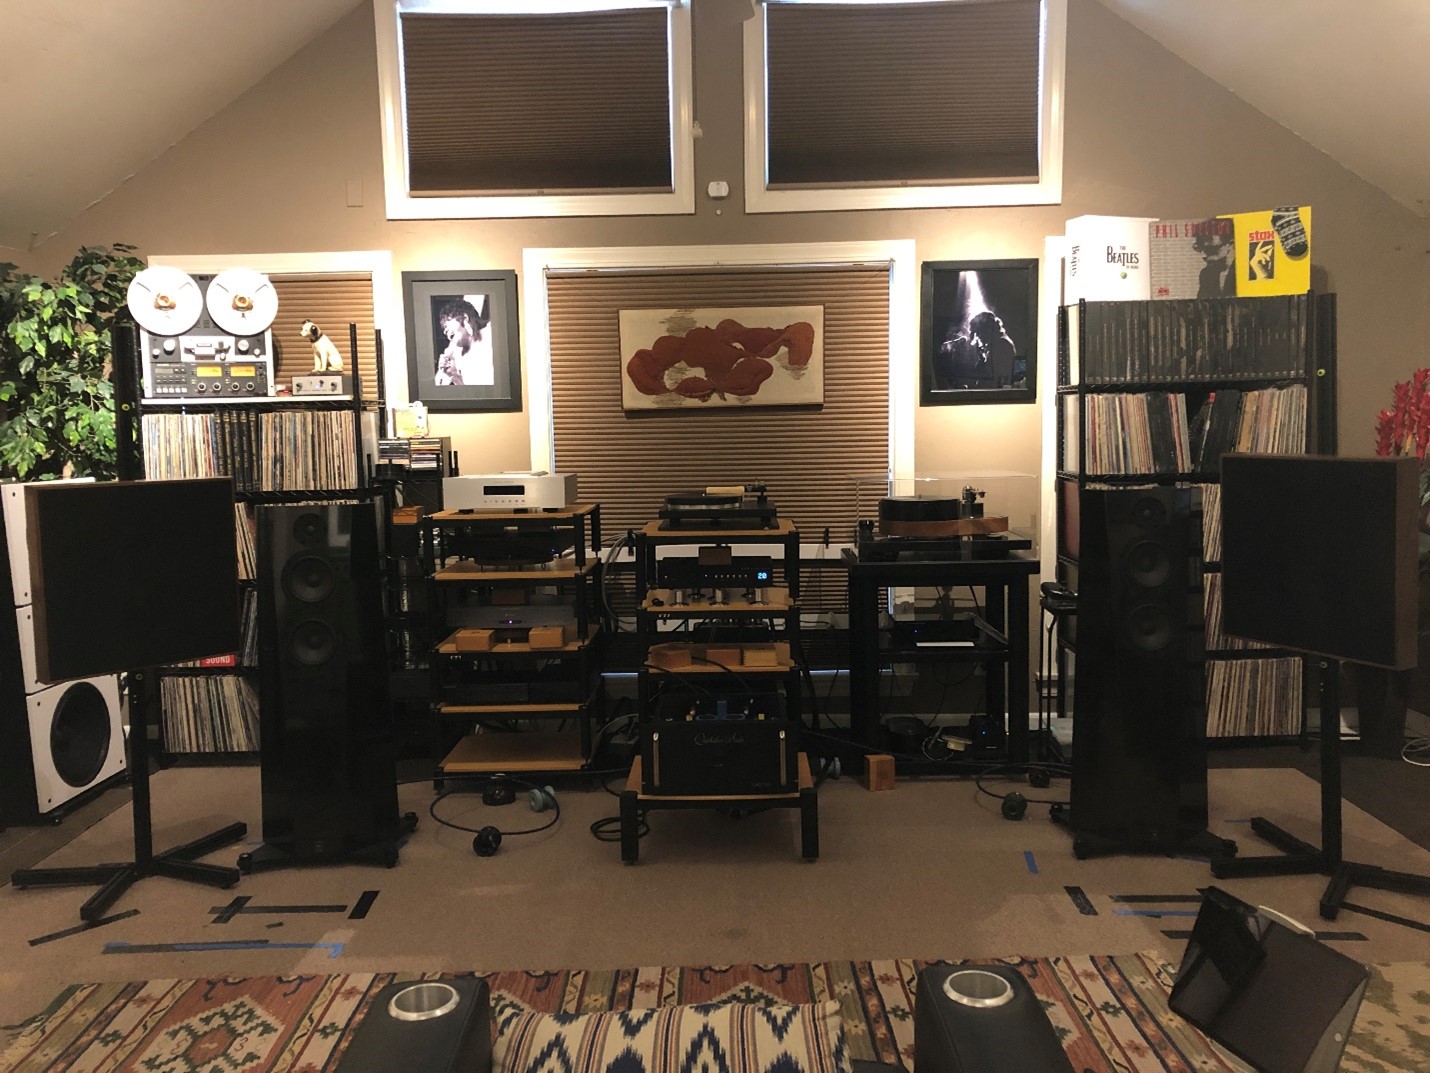
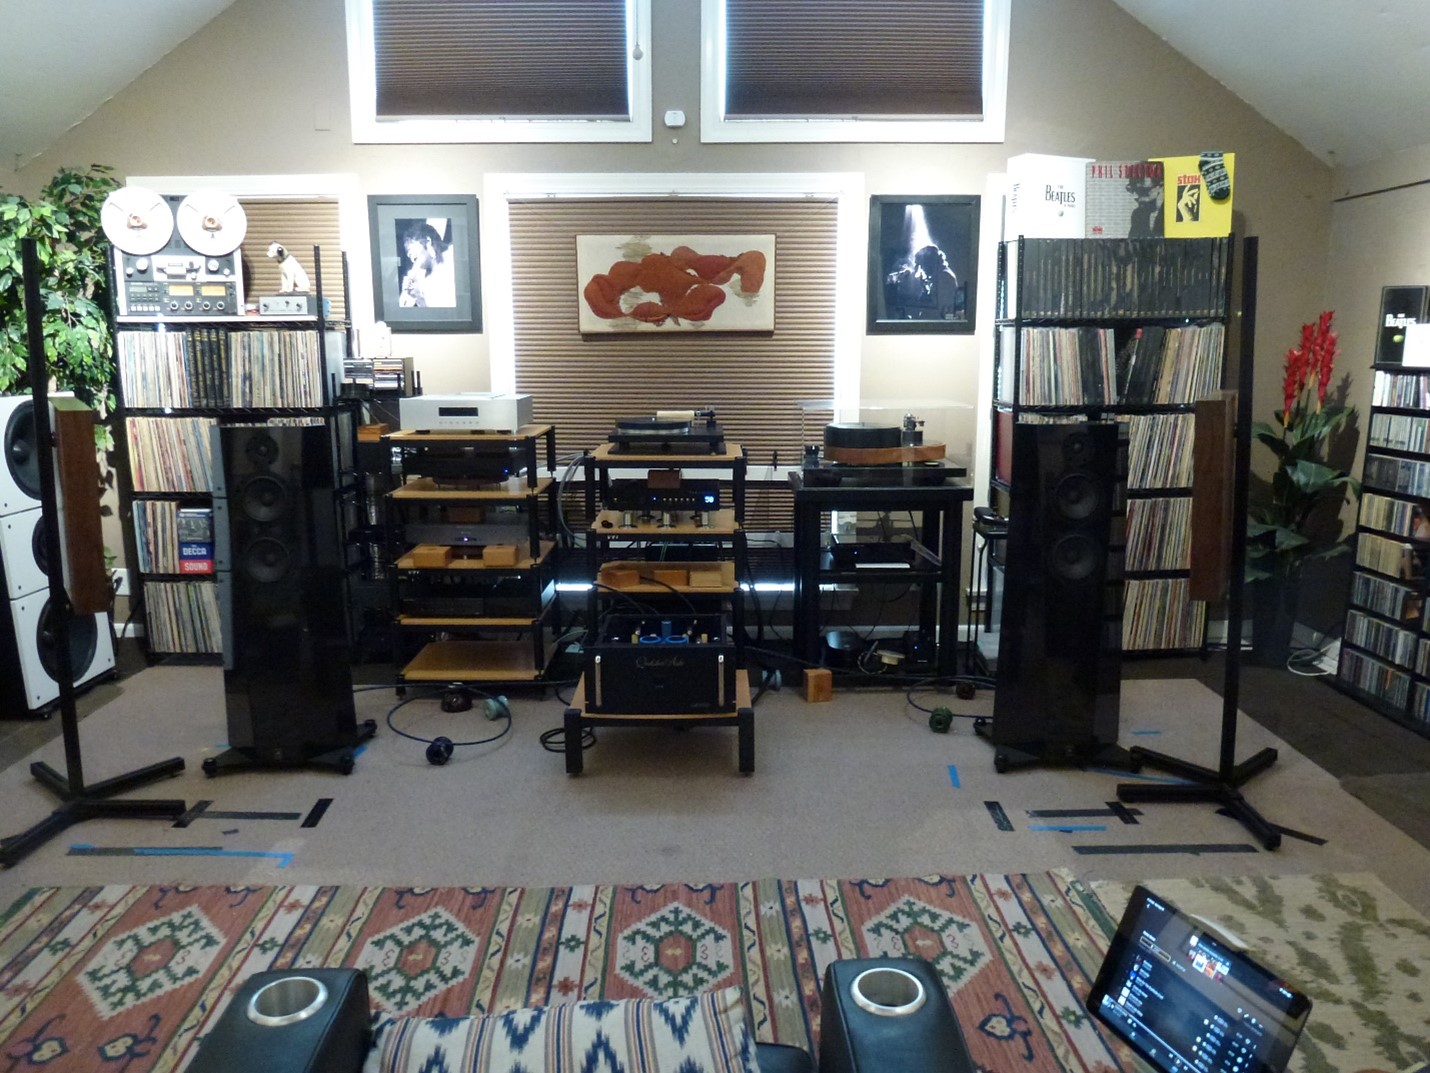
I've been listening to music in the same room for over 30 years and know its audio qualities very well, including its imperfections. The room measures 20 by 22 feet and has a 13.5 feet high vaulted ceiling. All four walls sport racks that hold records, CDs, and reel-to-reel tapes. In those three decades, I have experimented with various acoustic treatments and digital room correction solutions and have developed a good understanding of their effects. I have found that some solutions work better than others, and often, by creating new issues, the cure can be worse than the problem
My permanent acoustic treatments include a sound-absorbing "hanging cloud" that runs the length of the ceiling peak and some fixed upper corner treatments that minimize the impact of the vaulted ceiling echoing back sound.

As an experiment, to minimize reflections, I added extra panels to the walls in strategic locations. I also included more absorber/diffuser panels on the angled ceiling. However, I found that these additions negatively affected the room's overall dynamics and sense of spaciousness and created a sound that lacked life. Overtreated rooms are a common issue I experience when visiting other music rooms. These rooms tend to be over-treated, draining the music's vitality. I mentioned earlier that I had used the Aperture panels centered between my speakers and on the side walls at the first reflection points, which put them about four to five feet from the speaker. That gives the speaker plenty of space to "throw" sound into the room that can be reflected back to me from the various angled surfaces on the walls and ceiling before it gets to the Aperture panels.
Using Aperture panels in the conventional center/sidewall configuration did reduce some unwanted reflections but left room for improvement. I wanted to further eliminate these tone/soundstage disrupting reflections by incorporating additional Aperture panels, but installing them would require more money and space. I have been down that toll road before with other acoustic panel solutions. Since more Apertures was a non-starter, this near-field configuration appealed to me.

Large room …… Big difference
The aim of the Aperture panel near-field configuration is similar to near-field speaker listening. They try to limit the speaker's interaction with the room and its impact on the sound at the listening position. Minimizing the sound projected into the listening space can reduce the reflected sound's adverse effects on the soundstage. Although a near-field speaker setup can reduce the influence of the room, I don't prefer this setup as it feels like I'm wearing a pair of large headphones and don't get the music scale I like to experience. Yes… I want it all!
After experiencing the near-field Apertures in a small hotel room, I wondered how they would perform in my spacious room.
I decided to try three different near-field Aperture orientations. The music selection I chose was "Come on Home" by Boz Scaggs, a song I am very familiar with. It offers a simple drum beat and piano accompanied by guitar, organ, and Boz's unique voice. It is not overly complex, and I often use it for system/room evaluation.
Configuration 1
I chose this orientation as the first configuration to judge the effect of the Apertures, thinking it would have the biggest impact. Surprisingly, it did not in any significant way address my room's issues. The guitar tone did not have the richness I knew was there, the piano sounded uninspired, and the organ was buried in the music. Some glare was still noticeable in Boz's voice, and it was a bit thinner than it should have been. The soundstage depth and width remained unchanged. Overall, this configuration was not effective.
Strike one.
Configuration 2
This setup had a significant impact but did not entirely meet my expectations. The soundstage was more substantial, but it lacked focus. There was a slight improvement in depth and reduced glare, but overall, the soundstage was confusing, resulting in a more homogenous sound. Different, no doubt, but not better.
Strike two.
Configuration 3
Within the song's first ten seconds, I noticed a significant sound quality improvement. The soundstage was more expansive, and the dynamics were more compelling. The piano and guitar work had improved timbral character and so were more lifelike. Boz's voice was well-rounded and complete, and the organ "floated" throughout the song as it should. Any previously noticeable glare was absent, and I could turn up the volume without it driving me out of the room. With the panels facing the speakers, to me, the positive results of this configuration seemed counterintuitive. The soundstage was expansive and focused, and the instruments sounded lifelike in size and space. Frankly, with the panels facing back at the speakers, I was not anticipating this sound. I have long searched for this result trying numerous components, cables, and room treatments. However, within just a few hours of adjusting the Apertures, I made more progress than in the past five years.
Home run!
What about a Homemade Panel?
During my audition with the Stillpoints Acoustic package, I couldn't help but think about the price tag of $960.00 per panel and $719.00 per stand, bringing the total investment cost to nearly $3350.00. Being mindful of my finances, I wanted to know if any acoustical panel could produce the same result. Perhaps what I heard had more to do with the panel's orientation than the panel itself, and I wondered if using my homemade absorber/diffuser panels could save me money. To test this theory, I exhumed from storage my 2' x 4' Owens Corning F-703 compressed fiberglass panels with reflective strips. Could orienting them in Configuration 3, deliver the same sound improvement as the Aperture panels? Unfortunately, no. The system lost its dynamic expression, and the soundstage collapsed, resulting in a noticeable change in each instrument's timbral quality and in Boz's voice. This disappointing outcome reminded me of previous experiences with many other acoustic panel options I had tried over the years that also rendered the system un-involving.
Total strike out!
Small Room ……. Even Bigger Difference
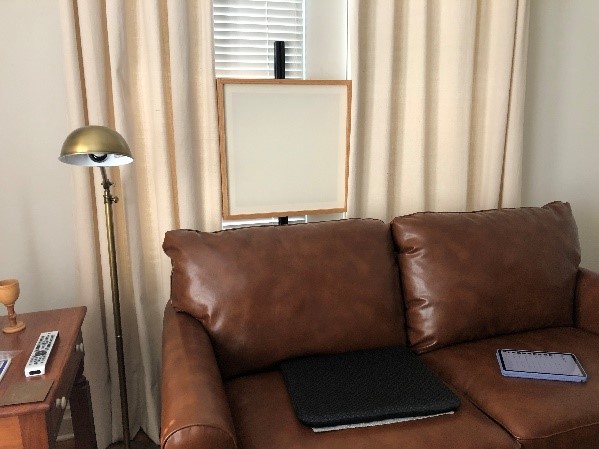

After experiencing the impressive impact of Aperture panels in a small hotel room, I thought of my local audiophile friend who has an excellent sound system shoehorned into a compact 12 x 12 x 8 room. Though timbral balance was good, the soundstage has always been limited to recreating a small diorama of the performance.
Following a recent listening session in my room, my friend returned to his system and expressed disappointment in the lack of scale and size. He had all but given up on creating a larger soundstage in his small room. Recently, he tried using his four original Aperture panels in the traditional layout - one between the speakers on the front wall, one behind his head, and one on either side at the point of first reflection. While this improved the overall tonal quality of the system it didn't create a larger sound field.
I brought over four Aperture II panels and two stands and initially replaced his original Apertures with the Aperture II's in the same positions. I was surprised by the improvement in sound quality. The soundstage was more open, but the surprising improvement was that the music had a wider dynamic range. The new Aperture II panels were, without a doubt, an improvement over the original version, but the best was yet to come.
Next, we took the two panels on either side and put them on stands close to his speakers to audition the three configurations I had tried in my room.
The music I picked was the live Sara Bareilles version of "Sitting on the Dock of the Bay".
Since we were trying to improve the soundstage size, I wanted to use a song that had a large feel to it and included audience participation so I could see if the Apertures would have the same "room enlarging" effect I had experienced in the Stillpoints AXPONA hotel room.
 Configuration 1
In contrast to my room, where this configuration had minimal impact, here it had the opposite effect! The walls and ceiling seemed to vanish, creating a larger soundstage and heightened dynamic range. Sara's piano playing felt more powerful, with a greater intensity of artistic expression, while the crowd's cheering spread across the front wall and beyond the side walls, without overwhelming the space. Remember, all this improvement was achieved by simply moving the side panels closer to the speaker and angling them outward using the stands. Color me impressed. My friend was thrilled with the outcome and eager to explore the other two configurations.
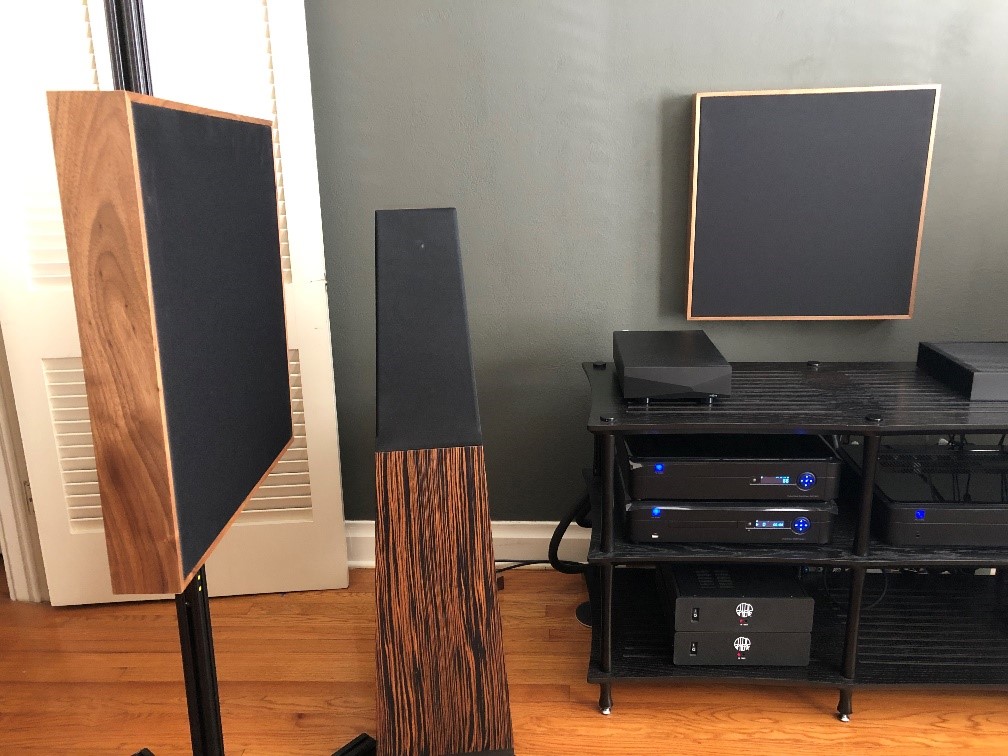 Configuration 2
This configuration produced the same soundstage defocusing that I experienced in my room. That, along with a reduction in the size of the performance, made this set-up less musically involving, and we quickly moved on to try configuration 3.
Configuration 3
In my haste to try the different setups, I failed to grab a picture of this one, but it mimics configuration 3 that was magical in my large room where the panels face back at the speaker.
With that experience in mind, I was anticipating an impressive auditory experience. However, to my dismay, the soundstage was smaller and unimpressive, and the dynamics were nowhere near what we had experienced with Configuration 1, making this the least favorable of the three setups.
Configuration 1 was the undisputed winner in this room. All these experiments only highlighted the importance of experimenting with these versatile panels, as there is no one-orientation-fits-all solution.
Dipole Speaker Application
Bruce had mentioned the effectiveness of Aperture Panels when paired with dipole speakers, which piqued my interest after recently reviewing the PureAudioProject Trio15 Coax speaker. I previously owned Spatial Audio dipole speakers and currently have in storage a pair of Acoustat 2+2s. Although I appreciate the way dipole speakers blend with a room, the "combing effect" of the rear wave can sometimes soften instrumental focus within the soundstage. Sound Lab, an electrostatic speaker manufacturer, offers a solution with its acoustic accessory called S.A.L.L.I.E. (Sonic Attenuator for Lower Levels of Interference Effects). When placed behind their speakers, this tall accessory reduces the combing effect of the rear wave. While it could work with my 2+2s, owners of smaller dipole speakers such as Spatial Audio or PureAudioProject would require a more compact solution.
 Bruce suggested I test the Aperture panels with the on hand Trio15 coax speakers. He recommended I position them about two feet behind and at a mid-height level. To my delight, the dipole qualities I enjoy remained intact, and the instrument focus within the soundstage improved without sacrificing depth. I suggest dipole enthusiasts try this configuration, especially if their speakers are within three feet of the front wall.
Conclusion
At first glance, these seemingly innocuous 22" x 22" panels may seem costly and not physically impressive, but you won't need many. Using only two panels I experienced a noticeable enhancement in my system's sound quality.
After several months of testing the Stillpoints Aperture panels in different settings, I conclude that these panels have the potential to make a significant sonic improvement in almost any system and in almost any room. They are a powerful acoustic tool that I plan to permanently use in mine.
This $3350.00 investment effectively exorcized some acoustic demons that have troubled me for years. In just a few hours of positioning experimentation, I reduced these issues and elevated my system's sonic performance. With the Apertures in place, I hear more deeply into the music and my soundstage is better focused—in my opinion, a good return on investment In a high performance audio system
Lastly, it is important to note what the Aperture II panels don't do.
Unlike most of the acoustic treatments I've tried, the Aperture II acoustic panels don't interfere with the sound's tonal balance, they don't crush dynamics, and they don't diminish bass impact.
Somehow, much like the Thermos bottle, they just work!
Stillpoints Aperture II Acoustic Panel $960.00 each
Stillpoints Aperture Stands start at $719.00 each
Specifications
The Aperture II panels, 22" x 22" x 3", weigh seventeen pounds. They come in three different wood frame finishes - Oak, Cherry, and Walnut - and two screen fabric options, Black or Cream. $960 each. Stand prices start at $719 each.
Manufacturer Information
573 County Road A,
Hudson, WI 54016, USA
1-651-204-0605


